Terraform Project For Beginners
Automate your AWS Cloud Infrastructure with Terraform

Helen is a skilled IT professional with a strong background in DevOps Engineering, Cloud, and Technical/Customer Support. She has Implemented a Continuous Integration/Continuous Deployment (CI/CD) pipeline that significantly improves the speed and reliability of deployments. She has managed cloud infrastructures, resulting in significant cost savings, improved efficiency and reliability and as well demonstrated her expertise in carrying out zero downtime deployments.
I create technical articles to aid those new to DevOps/Cloud Engineering in their learning journey and also to document my own experiences and progress in the field.
TERRAFORM PROJECT FOR BEGINNERS
You are very welcome to my blog 👍 😊👏
Are you currently learning Terraform but need some hands-on experience and a project to get more confidence? Welcome! you are in the right page.
I am here to guide and show you how I carried out this project in Terraform. This will help you understand how to automate the deployment of resources in AWS with Terraform using configuration files. Completion of this project will give you a push to advance your learning in Terraform.
PROJECT TOPIC:
Create an EC2 instance, deploy on a custom VPC and custom subnet and assign a public IP address. Deploy in such a way that you won't only SSH into the server and make changes to it, but as well automatically set a webserver to run on it in order to handle web traffic.
So let’s begin! Grab your cup of coffee and let's dive in 🏋️♂️
What you will need:
• AWS account • Linux • Visual studio code (my preferred source code editor)
STEPS
- Create a Key Pair
- Create a VPC
- Create an Internet Gateway
- Create a custom Route Table
- Create a Subnet
- Associate subnet with Route Table
- Create a Security Group to allow ports 22, 80 and 443
- Create a network interface with an IP in a subnet that was created in step 5
- Assign an Elastic IP address to the network interface created in step 8
Create an Ubuntu server and install/enable Apache2
SOLUTION
1. Create a Key Pair
The key pair will allow you to connect to your EC2 instance after deployment. To do this, Go to network and security pane under EC2 and click on key pair. Fill in the parameters and click on create.
Note: Use .ppk if you are on a Windows OS and probably want to use putty. If you are using Mac OS or Linux, use .pem After you click on create, it will be downloaded automatically. Let's proceed, we will need it later!
• Open Visual Studio, and create a folder named main.tf file. This is the file you can use to create your configuration files for the deployment of the resources required. Done that? Great 👍
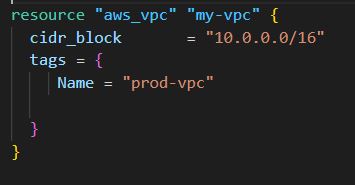
2. Create a VPC
To save you the stress of looking for documentation, you can use my style to
Search for it on your browser.
Go to your browser and type terraform aws vpc, click on the terraform registry by Hashicorp and copy
the template.

Here is the resource template 👇
3. Create an Internet Gateway:
Follow the same procedure. Search for terraform AWS internet gateway on your browser and copy the
template. This should come beneath the first resource
Here is the resource template 👇
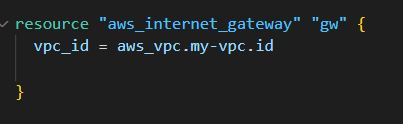
Feel free to choose the resource name of your choice i.e “gw” is the resource name here. The vpc_id = vpc resource id + vpc resource name + id
4. Create a custom Route Table
Here is the resource template 👇
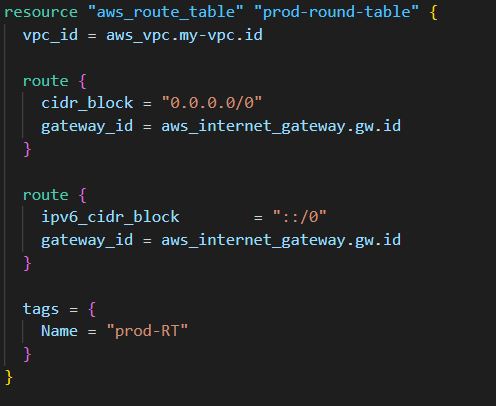
Note: You can customize the template and give any name of your choice. You basically need to follow the format. Tagging is optional.
5. Create a Subnet
Here is the resource template 👇
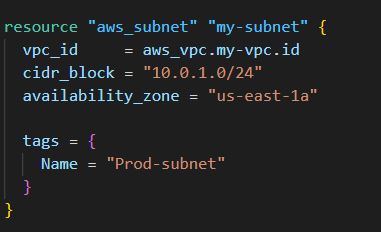
I decided to add an availability zone because I don’t want AWS to assign any availability zone randomly to my resources.
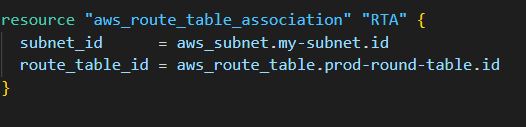
6. Associate Subnet with Route Table:
   There is a resource type in terraform called Route Table Association.
   This enables you to associate your subnet with a Route Table.

   Remember to arrange these resource templates sequentially as we progress even though sequence
   is not really important in Terraform. I suggested this so that you won't get confused.
Here is the resource template 👇
7. Create a Security Group
Here is the resource template 👇
resource "aws_security_group" "allow_web_traffic" {
name = "allow_web_traffic"
description = "Allow web inbound traffic"
vpc_id = aws_vpc.my-vpc.id
ingress {
description       = "HTTPS"

from_port        = 443

to_port             = 443

protocol           = "tcp"

cidr_blocks      = ["0.0.0.0/0"]
}
ingress {
description      = "HTTP"

from_port       = 80

to_port            = 80

protocol          = "tcp"

cidr_blocks     = ["0.0.0.0/0"]
}
ingress {
description      = "SSH"

from_port        = 22

to_port            = 22

protocol           = "tcp"

cidr_blocks      = ["0.0.0.0/0"]
}
egress {
from_port        = 0

to_port           = 0

protocol         = "-1"

cidr_blocks    = ["0.0.0.0/0"]
}
tags = {
Name = "allow-web"

 }
}
Let me explain the customization I did up there:
I deleted the ipv6_cidr_blocks as I don’t really need it. For the ingress policy, I duplicated it and created it for different ports because we need those ports to access our server. I used 0.0.0.0/0 for the cidr to enable all IP addresses. Note that this practice is not used in a production environment in order to curb security risk.
Point to note: vpc_id = vpc resource type plus vpc resource name
8. Create a Network Interface with an IP in a Subnet that was created in step 5
Here is the resource template 👇
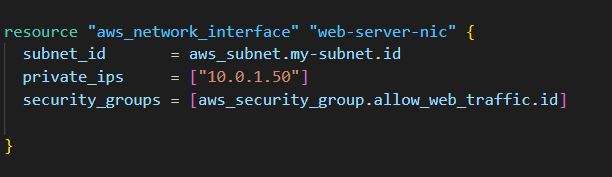
Point to note: subnet id = subnet resource type plus the subnet name as in step 5 security_groups = security_group resource type plus the subnet name as in step 7
9. Assign an Elastic IP address to the Network Interface created in step 8
Here is the resource template 👇
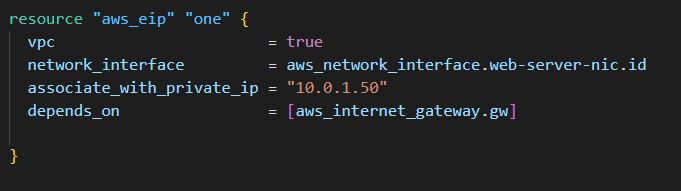
Note: Deploying an elastic or public IP address actually depends on the internet gateway. This is why I used "depends on" to set an explicit dependency on internet gateway.
10. Create an Ubuntu server and install/enable apache2
Here is the resource template 👇
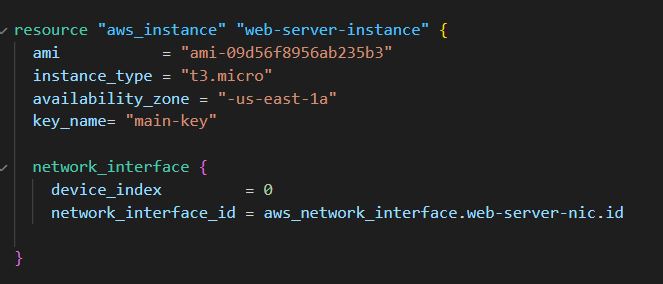
I created another block within the EC2 instance block to define extra parameters.
Point to note: "key_name" is the name given to the key pair you created in AWS console and "ami" stands for Amazon Machine Images and can be gotten from AWS Management Console. To get that, click on launch instances and select the server you want to launch. You will see AMI in the description, just copy and paste it in the "ami" parameter
Glad you have gotten to this level with me 👏👏👏
So currently in my configuration file, we have 9 resources in the main.tf file.
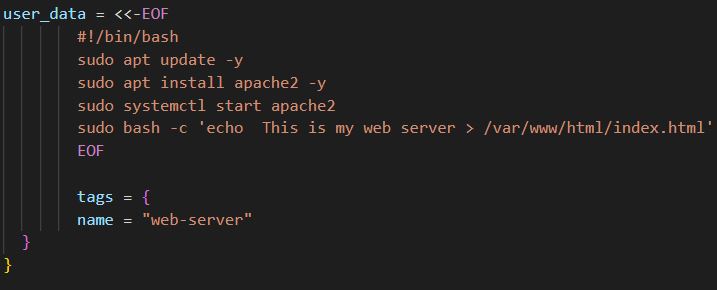
Now, let’s write a bash script that will tell terraform to run few commands on the deployment of this server so that we can automatically install apache2. See below:
Now our code is ready to deploy. Save the file, open your terminal and run the 3 terraform commands below as shown below:
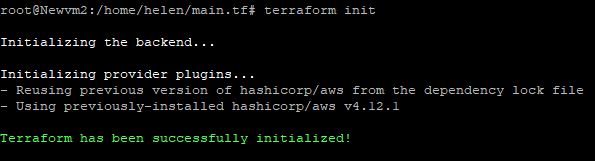
Terraform init
Check the result as below 👇
Terraform plan
Check the result as below 👇

Terraform apply
Check the result as below 👇

Got it? Cheers!! 👏✔ You just deployed AWS resources using Terraform
Let's go ahead and look for those resources we just deployed. Open your AWS management console, click on EC2 and other resources and you will see they have been successfully deployed.
If you copy the IP address and open it on your browser, it will display the message you typed in your bash script file. Mine is "This is my web server"
To access your EC2 instance, you will use the key pair you created earlier to SSH in the machine, and in this case I was able to access my EC2 instance.
Lastly, run terraform destroy command to destroy the infrastructure so it won't incur extra charges. See as below:
Terraform destroy

I hope you found this interesting 😊
Feel free to ask questions if you have any. I can be reached via LinkedIn: https://www.linkedin.com/in/helenchukwukelu/
Kindly follow me on LinkedIn for more technical content and project on Cloud/DevOps
Like 👍 comment, and share!
THE END!


