How To Host Wordpress Blog On Microsoft Azure
Setting up a WordPress Blog from the scratch

Helen is a skilled IT professional with a strong background in DevOps Engineering, Cloud, and Technical/Customer Support. She has Implemented a Continuous Integration/Continuous Deployment (CI/CD) pipeline that significantly improves the speed and reliability of deployments. She has managed cloud infrastructures, resulting in significant cost savings, improved efficiency and reliability and as well demonstrated her expertise in carrying out zero downtime deployments.
I create technical articles to aid those new to DevOps/Cloud Engineering in their learning journey and also to document my own experiences and progress in the field.
WordPress has remained the simplest and most popular way to create your own blog or website. WordPress powers over 43.3% of all the websites on the internet. It is used by some of the biggest and most well-known companies, celebrities, and brands in the world. Some of the companies that use WordPress are: CNN Press Room, Disney Books, Spotify Newsroom, Microsoft News, Wired, to mention a few.
What is WordPress?
WordPress is a free, open-source website creation platform. On a more technical level, WordPress is a content management system (CMS) written in PHP that uses a MySQL database.
As usual, I will guide you in the whole process of installing and setting up your website or blog hosted on Microsoft Azure. It is detailed and I believe you will enjoy the ride :)
STEPS
• Create a Virtual Machine on Azure (I used an Ubuntu server)
• Set up an Nginx server
• Set up PHP
• Set up MySQL and create a simple database
• Install WordPress
NOW LET'S GO!
Before we go ahead, what is WordPress?
WordPress is a free, open-source website creation platform. On a more technical level, WordPress is a content management system (CMS) written in PHP that uses a MySQL database. STEPS:
1. CREATE A VIRTUAL MACHINE IN MICROSOFT AZURE
I have created my Ubuntu server in Azure. I am using Putty as my SSH client. Login in to your terminal and get ready for the second step.
2. INSTALL NGINX
First of all, you need to ensure that all the packages on your installation are up to date. Run the following command in your root user:
apt update

Now, go ahead to install Nginx. But what is Nginx?
Nginx is the server that will be listening to someone's request to display your website's content. Run the command below to get it installed:
apt install nginx

Note: I am in the root user as you can see from my terminal in the screenshot above. So I don't really need to use sudo command. If you aren't using the root user, go ahead and use 'sudo' as we have them in the commands.
After the installation, check the status of Nginx with the command below:
systemctl status nginx

From the screenshot above, you can see that Nginx server is active and running.
Configure Nginx
At this point, navigate to the directory where Nginx default configuration file is and do some configuration. Execute the commands below one after the other:
cd /etc/nginx/
cd sites-available/
ls
You will see it display just like we have in the screenshot below:

Execute the command below to open your editor and do some configuration in the default config. file.
vi default**
I will explain how I did my configuration as shown in the screenshot below👇

In the default file, as shown above, the server listens on port 80. The colon you see in the [::] means it can be any IP address but on port 80. If you want to restrict it to a specific IP address, then add it in the square bracket eg [27.67.240.45]
if your requirement states that it should have SSL/HTTPS, then you have to go to SSL configuration and enable port 443. This is recommended for your security, but I will skip that step for now.
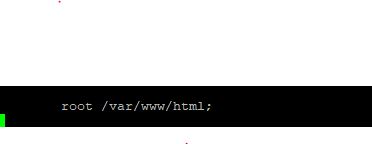
In the next step of configuration, you can specify your path if you created a new directory to store your file. But in the screenshot below, I didn't create a new directory, it is still the default part. If you want to change the part, you have to create a new folder and then replace the html with the name of your folder. For example, var/www/directory_name.
In the screenshot below, I added the index.php (the one I circled in red) because I am using PHP as an application for this project. Failure to add will make Nginx not to be able to handle PHP requests.

In the second line just as shown in the screenshot above is the server name. It can be your IP address or domain name. I got my domain name from nip.io website for the purpose of this project.
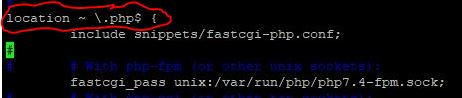
To add my PHP script, the line circled red in the screenshot below explains that each time my file has .php in it, it should load the file and pass it to fastcgi_pass unix:/var/run/php/php7.4-fpm.sock; to process it.
Now, the configuration is completed and the below image will show what I did:
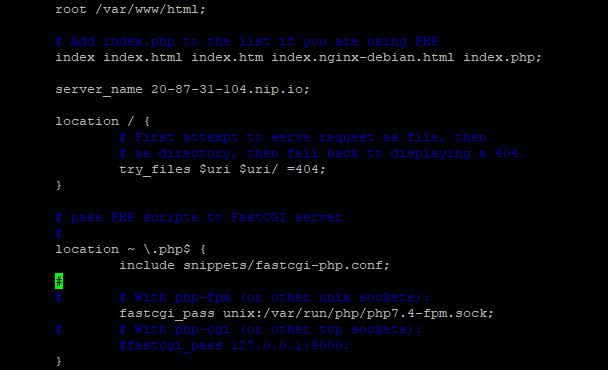
Note: I uncommented some lines in the configuration file because they are needed to be part of the configuration.
Save the file and next is to test it. Run the command below in order to test if your configuration is okay:
nginx -t

The above image displays that syntax is okay and it is successful. It is recommended you test your config file to be sure there is no error in it.
Now, restart the server and check the status of your nginx with the commands below:
systemctl restart nginx
systemctl status nginx
See my own result below, Nginx is active (running):

Now go to where the HTML file is stored by running the command below:
cd /var/www/html
ls -al
Test your server. Run the command below:
echo "Welcome" > test.html
From the browser, paste IP address or domain name slash (/) test.html. For example,
34-54-213-67.nip.io/test.html
You will see if the content of your page is displaying or not.
Displaying? Great!!!
INSTALL PHP
Why does WordPress require PHP to run?
WordPress uses PHP to do all of its processing including figuring out what the URL’s web request is, what to go grab from the database, what files to load and when, validating user permissions, checking options, fetching post metadata, calling plugins, and calling the theme. It uses it to process form fields, image and document uploads, etc. Before installing PHP, first, install the pre-requisites, but you need to be in the home directory. You may have to use cd ~ to go back to your home directory.
Run the command below to prepare for PHP installation:
sudo apt -y install software-properties-common
sudo add-apt-repository ppa:ondrej/php
Now install PHP using the command below. I added an extension because PHP comes with an extension. It might be to process images or some other things you may need.
sudo apt install -y php7.4 php7.4-fpm php7.4-bcmath php7.4-cli php7.4-common php7.4-curl php7.4-dev php7.4-gd php7.4-intl php7.4-json php7.4-mbstring php7.4-mysql php7.4-opcache php7.4-readline php7.4-xml php7.4-zip
After successful installation, check the PHP version by running the command:
php -v
It should display just as we have it in the image below:

INSTALL MYSQL SERVER
Why do you need to install Mysql? This is to handle database requests. Run the command below:
apt install mysql-server

Installed successfully? Good!
Connect to MySQL server by running the command below:
mysql -u root
Set the Password of MySQL server
You need the Mysql ALTER USER command to be able to set the password. Run the command below:
ALTER USER 'username'@'localhost' IDENTIFIED WITH caching_sha2_password BY 'password123#@!';
Note: You can change 'username' with any username of your choice as well as replace 'password#@!'; with your own password. You can then quit using the command:
quit
Then run the command below and it should allow you to enter your password. Without first using ALTER USER above, running the below command would give error.
mysql -u root -p
Enter your password and run the command:
quit
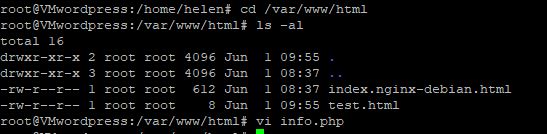
The next step is to test your PHP to ensure it is working before moving to the next stage. Change directory to html with the command below:
cd /var/www/html
ls -al
It should display as shown below:
PHP needs a simple configuration. So run the command below and have a look at the image below on how you can do that.
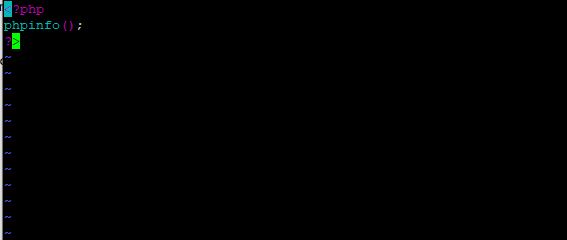
vi info.php
As shown in the screenshot below, I configured a simple PHP file just for testing
Save the file and head over to the browser, paste your domain name or your IP address/info.php and press enter. For example 23-65-671-40.nip.io/info.php
It should display the PHP page.
Is it displaying? good!!!
If you have gotten to this point, you deserve a cup of coffee 😊 so grab one for yourself and collect these thumps up from me👍👍👍
It is time to install WordPress!
WORDPRESS INSTALLATION
Go to wordpress.org and click on get WordPress. Copy the download link for use in the terminal and run wget command plus the link you copied.
See the command below:
wget https://wordpress.org/latest.zip
After installation, please check using the below:
ls -al
It will display as below:
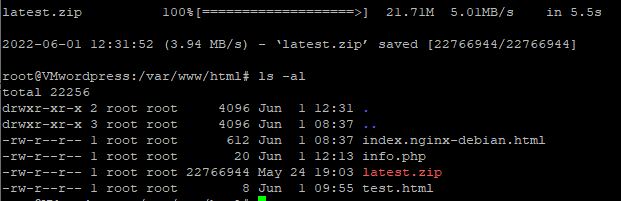
As you can see from the above, there is latest.zip which needs to be unzipped, install unzip key.
sudo apt install unzip
ls
Now create a new directory. I called mine 'blog'
mkdir blog
Unzip the file by running the command below:
unzip latest.zip -d blog
Change directory to blog, Move WordPress into var/www/html and then to blog
cd blog/
mv wordpress/ ../
This will move WordPress up to var/www/html instead of it being inside the blog directory.
ls
Run the commands below to remove blog folder and rename WordPress
rm -r blog/
mv wordpress/ blog
ls -al
It should display as shown below:

change directory to blog to see the content/files with the command below:
cd blog/
ls

You should see contents in the blog just as displayed in the screenshot above
The next thing step is to go to your browser to test WordPress using your domain or IP address forward-slash (/) blog. Example domain_name/blog or IPaddress/blog
GREAT!!!
You will see your page just as displayed below:
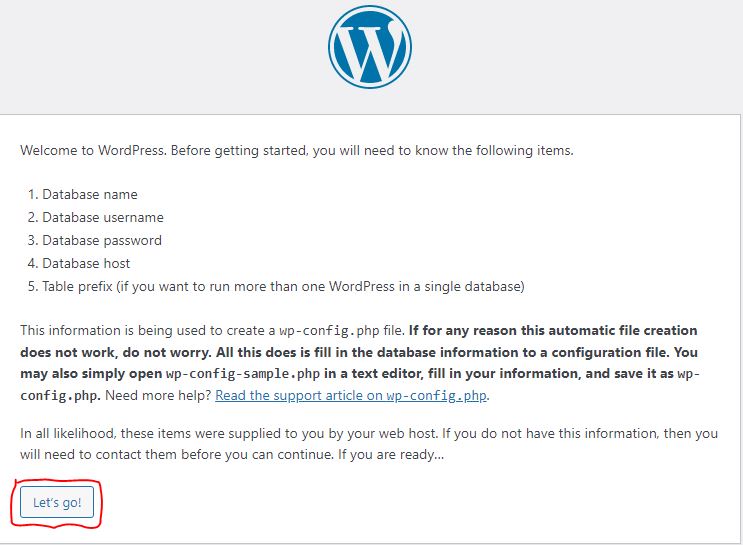
When you click on 'Let's go', It will request database information, so go to your terminal and create the database name and password with the command below:
CREATE DATABASE
To create a database, run the command below:
mysql -u root -p
Enter your password
Then run the command below:
CREATE DATABASE wordpress;
Note: wordpress in the above command is the database name. You can give it any name of your choice.
Kindly go to the browser and fill in the database name, username, and password. Every other thing remains the same. Click on submit button.
You may experience an "error establishing a database connection" displaying an incorrect password or username error in the page after you click submit...but no worries.
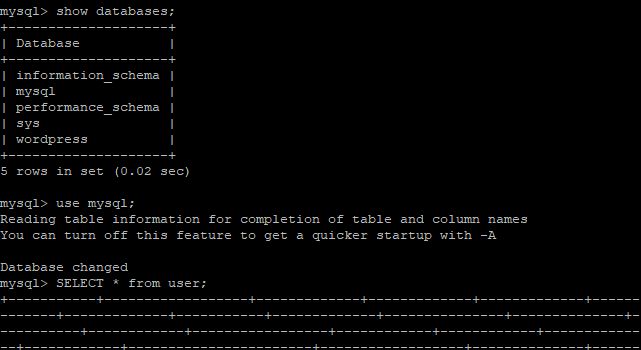
Go to your terminal and run the commands below to confirm your database:
show databases;
use mysql;
SELECT * from user;
You will see it display as I have it in the image below 👇
Our target is to set a password that MySQL can recognise/accept which is in line with MySQL password policy. Continue with the command below:
Set your database password
To create a password for your database, run the command below:
ALTER USER 'username'@'localhost' IDENTIFIED WITH caching_sha2_password BY 'password123#@!';
Remember to replace 'username' with your own username and then 'password123#@!'; with your own password and press enter.
If it accepts your password at this point...great!
But if you experience an error that your password does not meet the current policy, follow the steps below to set MySQL password policy to 'LOW' to enable you to set the password. Failure to do so will make it keep throwing the error at you.
Get that done by running the commands below:
SHOW VARIABLES LIKE 'validate_password%';
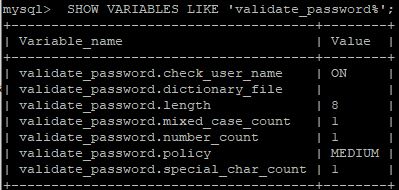
As you can see from the screenshot above, the 'validate_password.policy' is on medium. Bring it down to LOW so it can allow you to pass through this stage. Run the command below:
SET GLOBAL validate_password.policy = LOW;
Check to see if it is now on 'LOW' with the command below:
SHOW VARIABLES LIKE 'validate_password%';
The 'validate_password.policy' should be on LOW now. Am I correct? Good!
Use this command again to set your password, it allows you.
**ALTER USER 'username'@'localhost' IDENTIFIED WITH caching_sha2_password BY 'password123#@!';
** Remember to replace 'username' with your own username and then 'Password123#@!'; with your own password and press enter.
Now go to your browser (WordPress site that is open on your browser), click on 'Try again' button, fill in the password and username and click on 'Submit', it should accept that now.
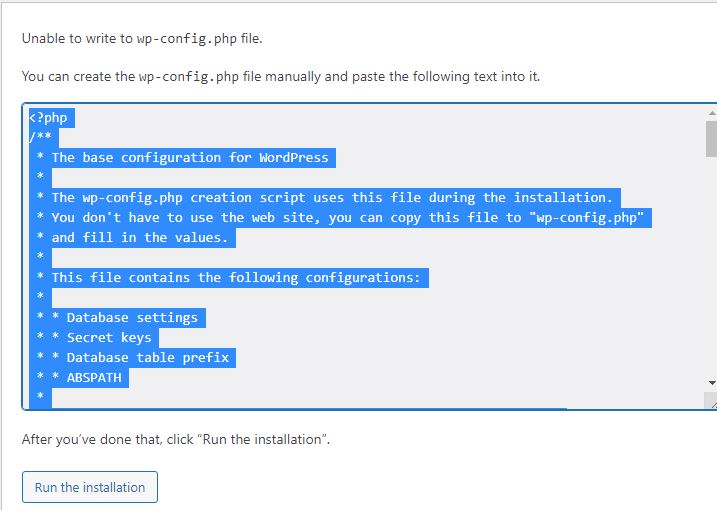
It will display the page just as shown above, it simply wants you to help run a task :). Right-click on the configuration files selected and copy it
Go to your terminal and quit the MySQL with the command below:
quit
Then run this command below:
vi wp-config.php
Take a look at the image below with the command:

Now that your editor is open, paste the configuration files you copied from the browser and save it.
Go to the browser and click on 'Run installation'
You should see a welcome page, kindly fill in the information and click on 'install WordPress'
SUCCESSFUL?
CONGRATULATIONS!. You now have a WordPress blog hosted on Microsoft Azure!
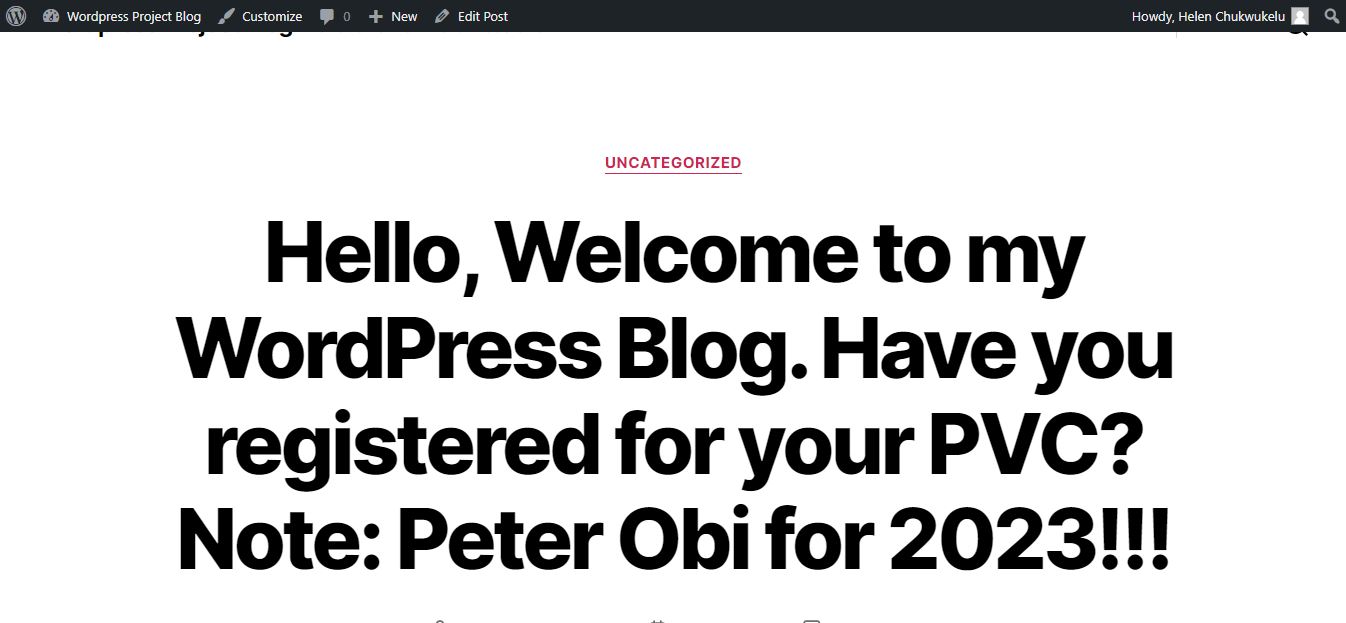
You can log in to the WordPress dashboard. From there you can make changes and updates to your website, it is just like a backend.
Whatever changes you make there will reflect on the URL of your blog. To see your blog, make use of the URL ie domain_name/blog. Example 23-56-204-66.nip.io/blog
Take a look at my own page below. I already edited the content of the page and changed the Theme. Don't judge me :) I didn't design it to look beautiful 😎
CONGRATULATIONS!!!
It has been a long step but you did it!!!
Feel free to leave your question in the comment session, I will ensure I attend to it as soon as possible. Also, your feedback will be appreciated 👍👍
You can connect with me on LinkedIn via https://www.linkedin.com/in/helenchukwukelu/
Like, comment, and share this article 🙏


