Deploy A Three-tier Web Application On Aws
THREE-TIER ARCHITECTURE ON AWS

Helen is a skilled IT professional with a strong background in DevOps Engineering, Cloud, and Technical/Customer Support. She has Implemented a Continuous Integration/Continuous Deployment (CI/CD) pipeline that significantly improves the speed and reliability of deployments. She has managed cloud infrastructures, resulting in significant cost savings, improved efficiency and reliability and as well demonstrated her expertise in carrying out zero downtime deployments.
I create technical articles to aid those new to DevOps/Cloud Engineering in their learning journey and also to document my own experiences and progress in the field.
HOW I DEPLOYED A THREE-TIER WEB APPLICATION ON AWS
Today I will be showing you how to design and build a multi-tier (three-tier) architecture on AWS.
A Three-tier architecture includes a presentation tier (public layer) which is exposed to the internet, Logic tier (application layer) which is private, and a data tier (database layer) which is also private. The idea is that the public layer should act as a shield to the private layers. Anything in the public layer is publicly accessible but resources in the private layers can only be accessed from inside the network.
With Three-tier architecture, we are providing the following solutions:
Scalability
High availability
Fault-tolerant
Security
Improved performance
- So, In this project, I deployed a Three-Tier web application on AWS.
Below are the requirement for this project:
AWS Account (free tier)
Putty or any of your favorite ssh client
ARE YOU READY, LET'S DIVE IN!
STEP 1: SIGN IN TO YOUR AWS MANAGEMENT CONSOLE
From your browser search for AWS management console and sign in with your AWS account. Free tier is preferable to avoid unnecessary charges.
STEP 2: CREATE A VPC
A Virtual Private Cloud (VPC) is a secure, isolated private cloud hosted within a public cloud (AWS). It can help you manage your AWS resources in a secured and scalable manner. This is what we want to achieve below:
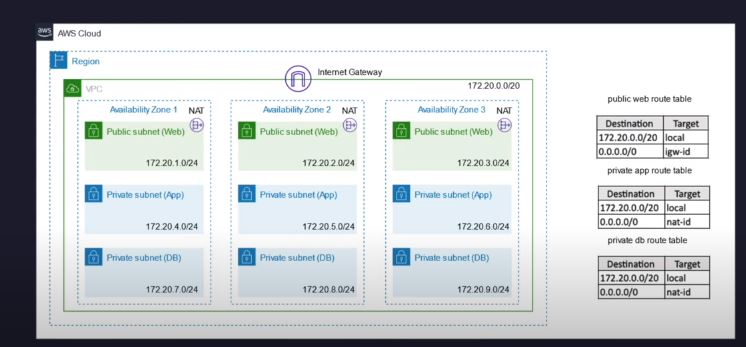
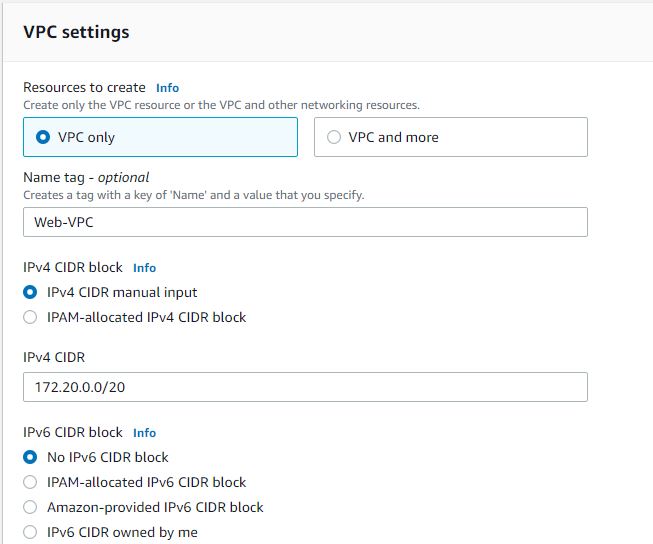
How to create the VPC
Navigate to the VPC section and click on Create VPC option. Give the name of your VPC and CIDR block you want to use. Leave every other thing as default and click on Create.
STEP 3. CREATE SUBNETS
You have to create 9 subnets and below are the ways I classified them
3 Public subnets in 3 different availability zones
3 private subnets in 3 different availability zones
Another 3 subnets for database in different availability zones
Remember to use a good naming convention in other not to mistake one for another. Kindly see how I created mine below.
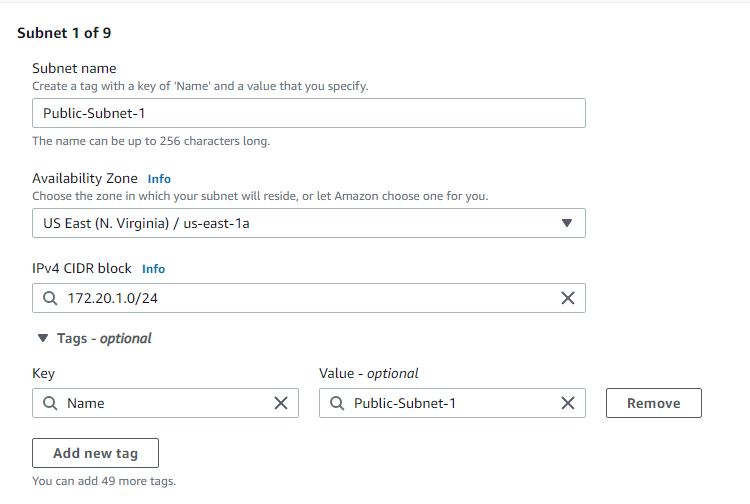
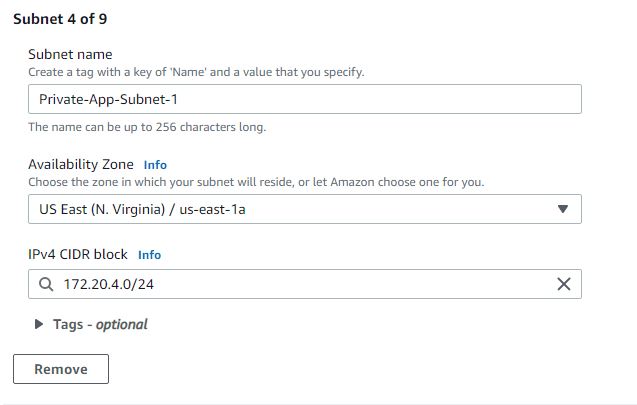
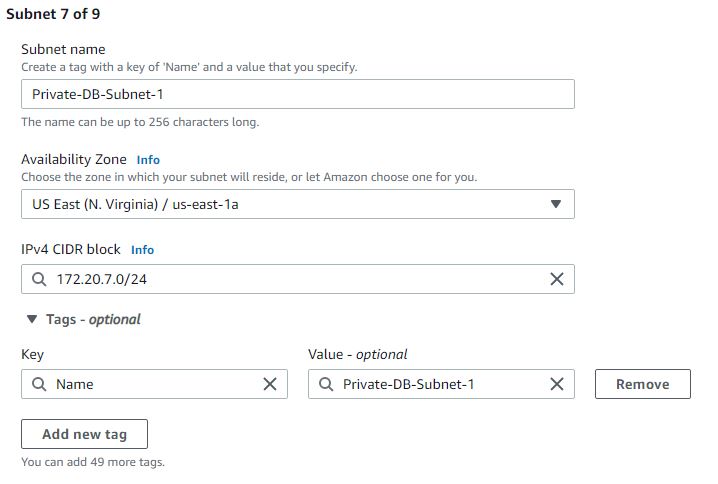
The 3 images above can help you in the naming.
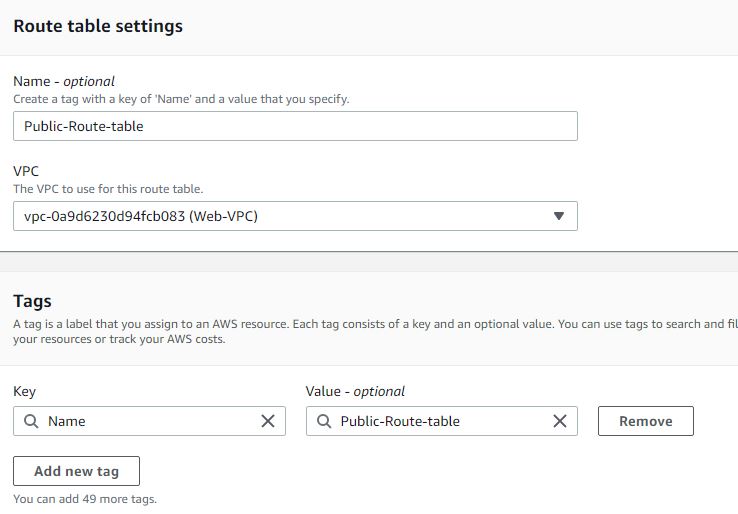
STEP 4: CREATE A ROUTE TABLE
When you create a VPC, it creates a default route table, however, you need to create yours. So you have to create 3 route tables for this project
Create 3 Route tables
The first should be a public route table (Web layer)
The second should be private (Application layer)
The third should be for your database (Database layer)
Ensure you select the VPC you have created when creating each of them. The image below displays the creation of the public route table.
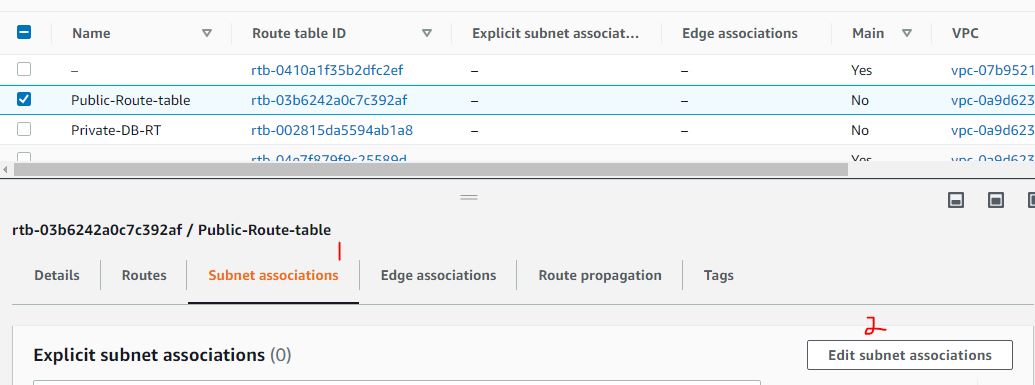
If you are done creating the three, verify to see if they have been created, if yes then you need to proceed to the next step.
STEP 5: ROUTE TABLE ASSOCIATION
It is not enough to create these route table, you need to associate each route table with appropriate subnets.
Select each route table and click on subnet associations beneath the table and then click Edit subnet association in order to associate it. An example is shown below:
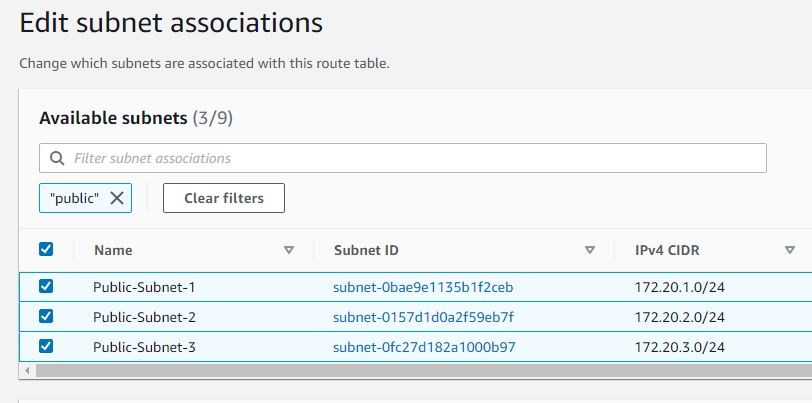
As you can see from the image above I selected all the public subnets, associated them with my public route table, and clicked on save association.
Secondly, selected the private App route table and following the procedure in the first association, associate it with the 3 private app subnets.
Also, do the same for the database route table and associate it with the private subnets you created for your database.
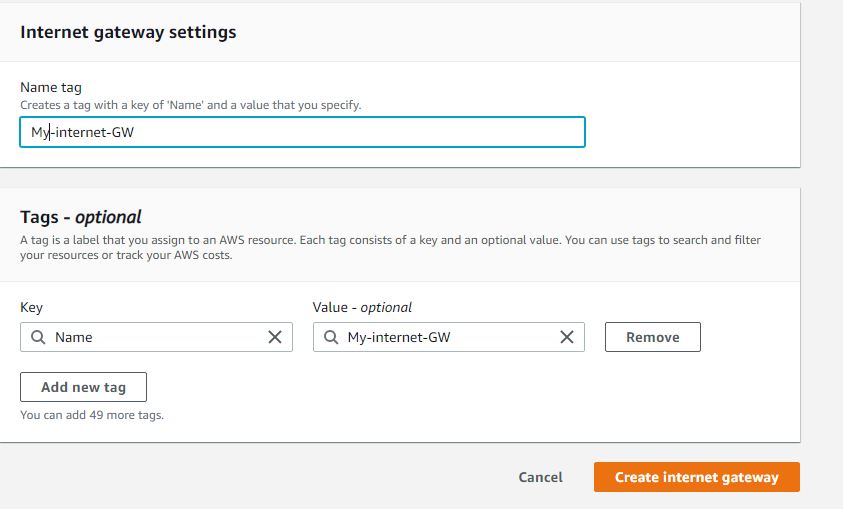
STEP 6: CREATE AN INTERNET GATEWAY
Since you have created route tables, you need to create an internet gateway in order to establish connectivity. Beneath the route table pane, click on internet gateway and create internet gateway
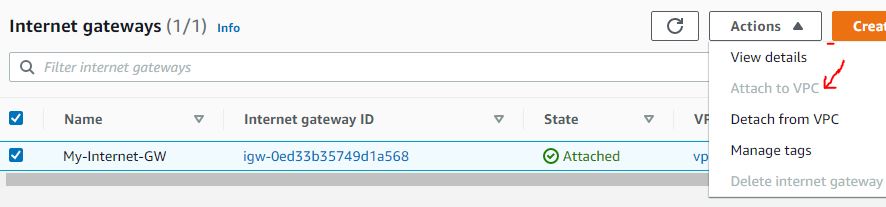
Once created, select the internet gateway, at the action button at the top, click on attach to VPC
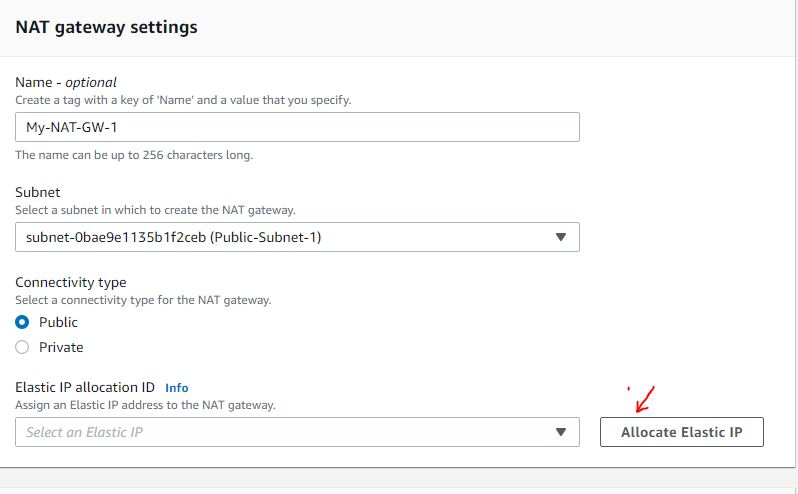
STEP 7: CREATE A NAT GATEWAY
For best practices, you need to create multiple NAT gateways to ensure redundancy, but in this project, you can create only one and it should in a public subnet.
Navigate to NAT gateway section and click on create NAT gateway
Click on Allocate elastic IP to allocate one to your NAT Gateway and then click on Create NAT Gateway.
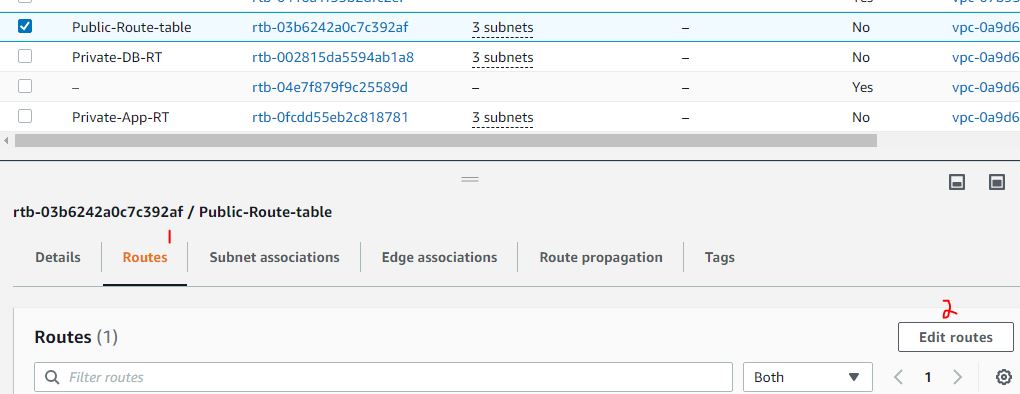
STEP 8: ESTABLISH INTERNET CONNECTIVITY VIA THE INTERNET GATEWAY.
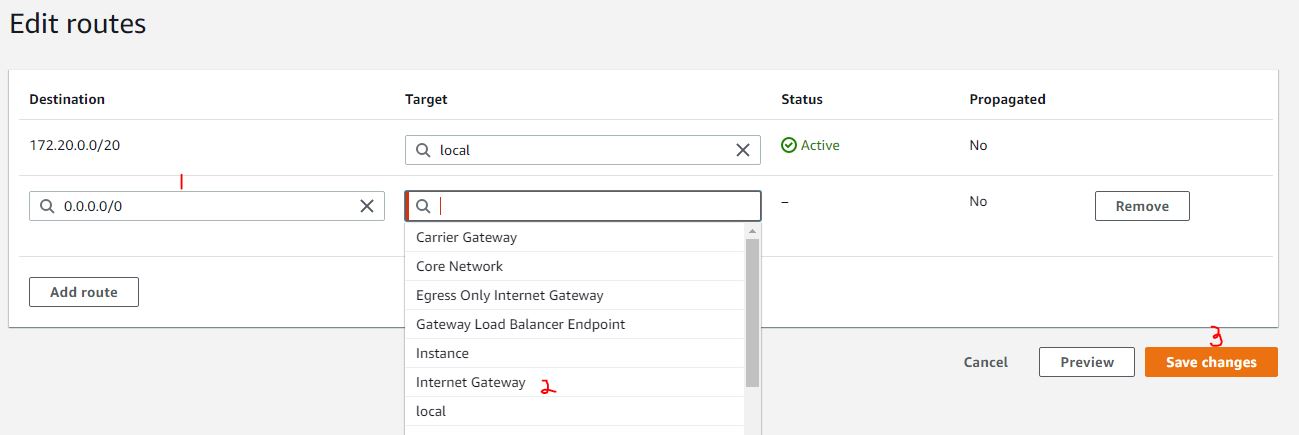
This requires you need to select your public route table and edit the route. In the image below I selected my public route table and clicked on the route option just beneath the table and then clicked on edit routes. Please do same and then click on add route, select the destination as 0.0.0.0/0 and under the target, select internet gateway you created and save it. See example as below:
STEP 9. ADD NAT GATEWAY TO THE PRIVATE APP ROUTE TABLE.
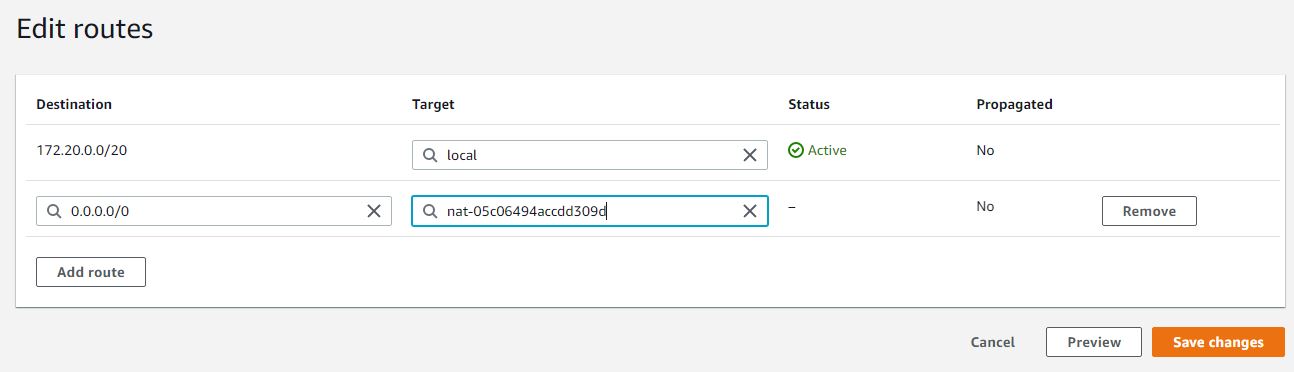
This is actually similar to the previous step above. So here you will be associating the private app route table with NAT gateway. Select the route table and click on route option just beneath the table and then clicked on edit routes. then click on add route, select the destination as 0.0.0.0/0 and under the target, select NAT gateway you created and save it.
STEP 10. ADD NAT GATEWAY TO ROUTE TABLE OF YOUR DATABASE
Kindly refer to 8th step
This Completes Our Networking Configuration
STEP 11. DEPLOY APPLICATION COMPONENTS
This is where you need to start deploying your instances.
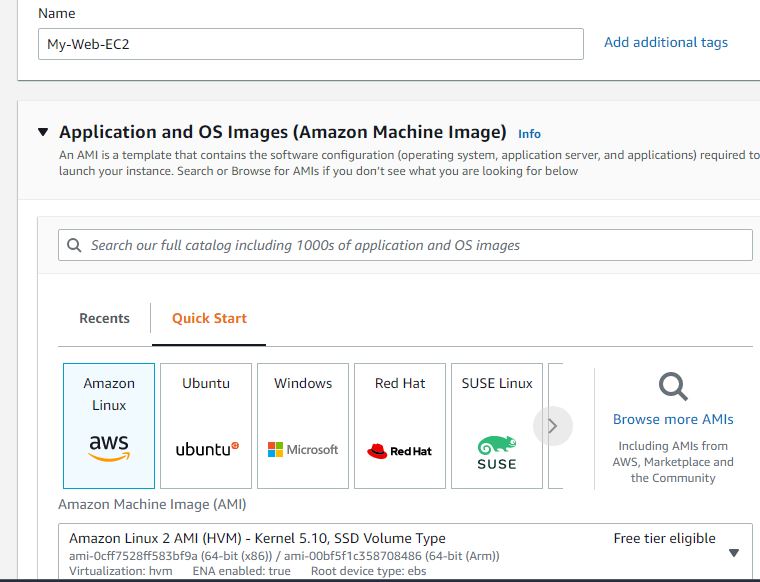
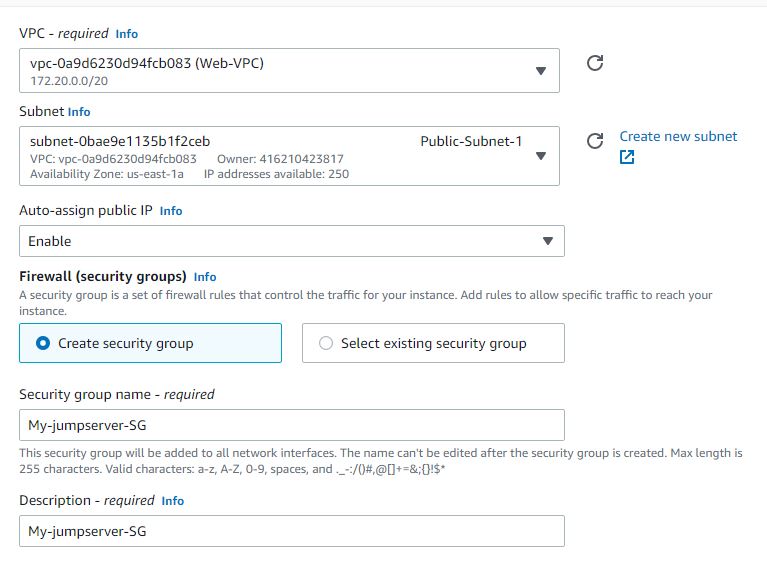
First, start by creating an EC2 instance for your web server.
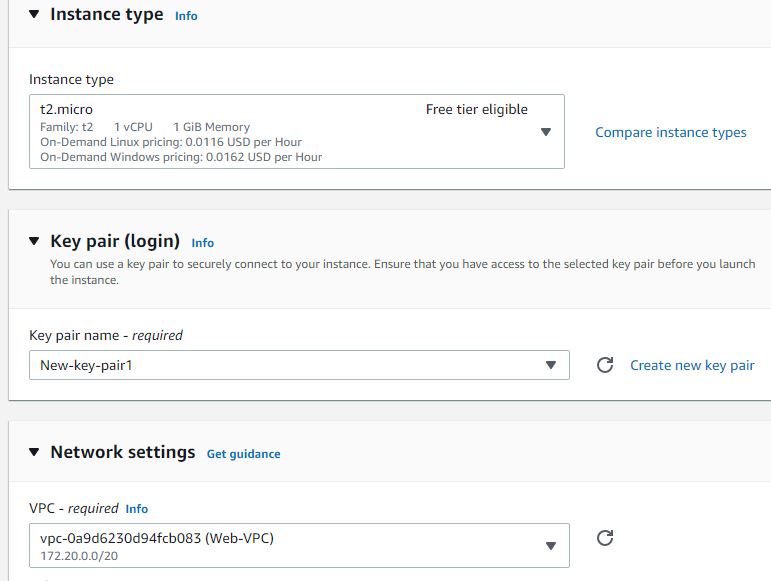
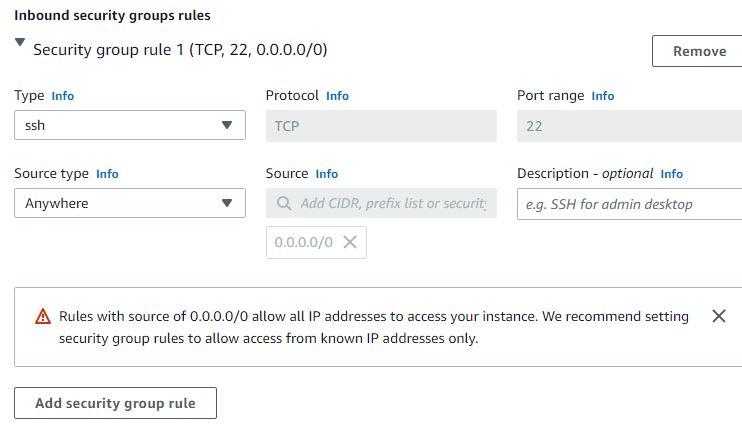
Choose Amazon linux, t2.micro as instance type, select the VPC you created under network settings and select public subnet 1 in first availability zone. Enable auto assign public IP address. Next is to select your key pair if you have one already, but If you don't have one, click on create key pair and attach it. Create a security group with default SSH port 22. My EC2 creation image is shown below:
STEP 12 : CREATE 2 EC2 INSTANCES FOR YOUR APPLICATION SERVER (PHP)
How to create your application instance:
Follow the steps in step 10 to create an instance but below are the parameters you will choose differently this time.
Create it in the private app subnet 1 in the different availability zone
Don’t enable "auto assign public ip address".
Create a security group with SSH port 22 enabled and then select your source as the web server security group created initially.
Done creating? great! move to the next stage to create the last instance
Create the second instance of your application server (PHP)
Follow similar configuration but have a look at what you should do differently.
Select Private app subnet 2
Don't create a new security group, add the security group used for the first application server as in step 12
Confirmation
If all the servers are in a running state now, proceed to the next step.
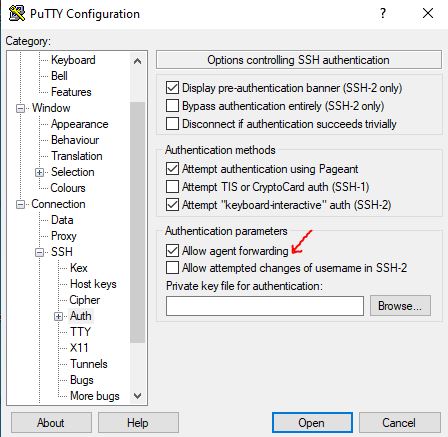
STEP 13: USE SSH CONNECTION TO CONNECT TO THE WEB SERVER
Open the instance you created in the private subnet and copy the public IP address. If you use putty as your ssh client, open it and have a look at the image below to guide you on how to connect.

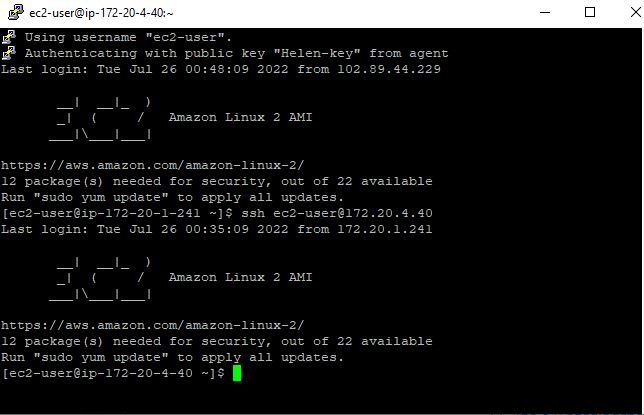
STEP 13: CONNECT TO YOUR APPLICATION SERVER IN A PRIVATE SUBNET FROM THE WEB SERVER
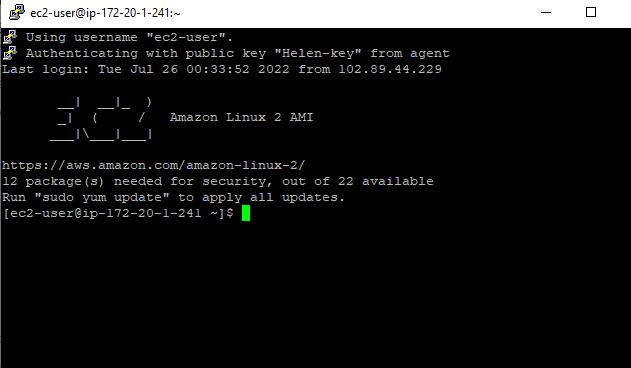
So basically what we are trying to achieve here is to SSH into the application layer via the web server. To achieve this, go to the second instance you created on the console, and copy the private IP address. In the same terminal, run the command below:
ssh ec2-user@<private ip address>
As you can see from my terminal, I was able to connect to my instance in the private subnet. Running the command will just switch you to the application server.
Remember to replace the <ip address with your private IP address
Just in case you experience a blocker with your ssh private key, refer to this link https://youtu.be/yCl8wkdSHA8 The short video describes clearly how you can add your private key and SSH to your instance in private subnet.
STEP 14: INSTALL PHP AND APACHE IN THE APPLICATION SERVER
Kindly refer to the documentation below: https://docs.aws.amazon.com/AWSEC2/latest/UserGuide/ec2-lamp-amazon-linux-2.html
That is where you can get the commands for the installation. Though I'm kind enough to list the necessary commands you have to run in order to install PHP and Apache :)
Update your instance
sudo yum update -y
Install the lamp-mariadb10.2-php7.2 and php7.2 Amazon Linux Extras repositories to get the latest versions of the LAMP MariaDB and PHP packages for Amazon Linux 2.
sudo amazon-linux-extras install -y lamp-mariadb10.2-php7.2 php7.2
Install the Apache web server
sudo yum install -y httpd
Start the Apache server
sudo systemctl start httpd
Enable apache server
sudo systemctl enable httpd
Confirm if it has been enabled
sudo systemctl is-enabled httpd
Use the command below to confirm if https service is running:
curl http://localhost
Working? Mine is working well as seen below:

Add your user (in this case, ec2-user) to the apache group.
sudo usermod -a -G apache ec2-user
Log out and then log back in again to pick up the new group, and then verify your membership.
- To Log out (use the exit command or close the terminal window)
To verify your membership in the apache group, reconnect to your instance, and then run the following command: groups
Change the group ownership of /var/www and its contents to the apache group.
sudo chown -R ec2-user:apache /var/www
To add group write permissions and to set the group ID on future subdirectories, change the directory permissions of /var/www and its subdirectories.
sudo chmod 2775 /var/www && find /var/www -type d -exec sudo chmod 2775 {} \;
To add group write permissions, recursively change the file permissions of /var/www and its subdirectories:
find /var/www -type f -exec sudo chmod 0664 {} \;
INSTALL phpMyAdmin
First, install the required dependencies
sudo yum install php-mbstring php-xml -y
Restart Apache
sudo systemctl restart httpd
Restart php-fpm.
sudo systemctl restart php-fpm
Navigate to the Apache document root at /var/www/html
cd /var/www/html
Download PHPMYADMIN package
wget https://www.phpmyadmin.net/downloads/phpMyAdmin-latest-all-languages.tar.gz
Once the package is downloaded create a directory. Create a phpMyAdmin folder and extract the package into it with the following command.
mkdir phpMyAdmin && tar -xvzf phpMyAdmin-latest-all-languages.tar.gz -C phpMyAdmin --strip-components 1
Then remove phpMyAdmin tar files with the command below:
rm phpMyAdmin-latest-all-languages.tar.gz
AWESOME 👏👍, You are through with the configuration of phpMyAdmin!
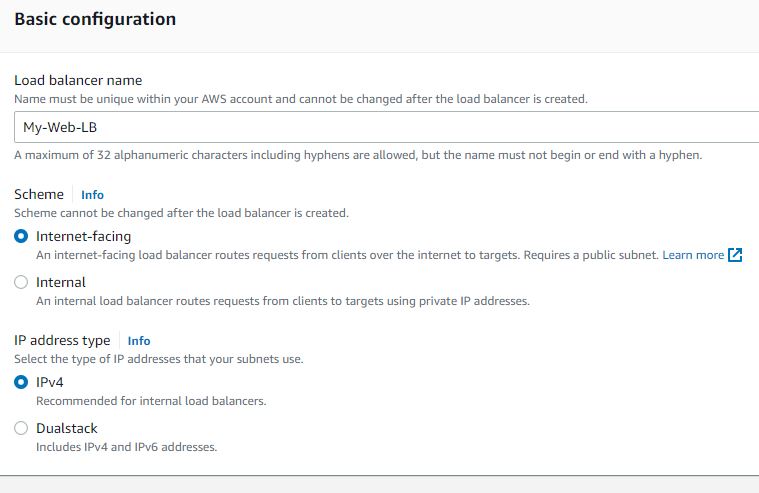
STEP 15. CREATE A LOAD BALANCER FOR THE APPLICATION
When creating a load balancer in AWS management console, follow these steps and take note of the parameters you should use.
It should be internet facing because you have to expose it to the outside world
Select the VPC you created
In availability zone, select at least 2 public subnets
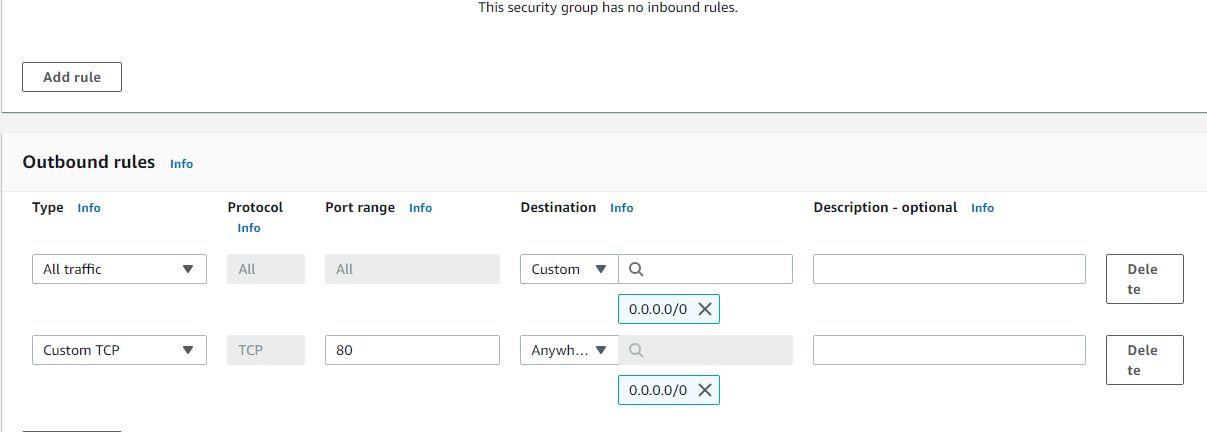
Create a security group and assign port 80 in the port range, select TCP protocol and make the source 0.0.0.0/0.
At the listener section, Create a target group
Register the target by selecting the 2nd application servers or instances you created, then select include as pending below as shown in the image below and then click on create target group

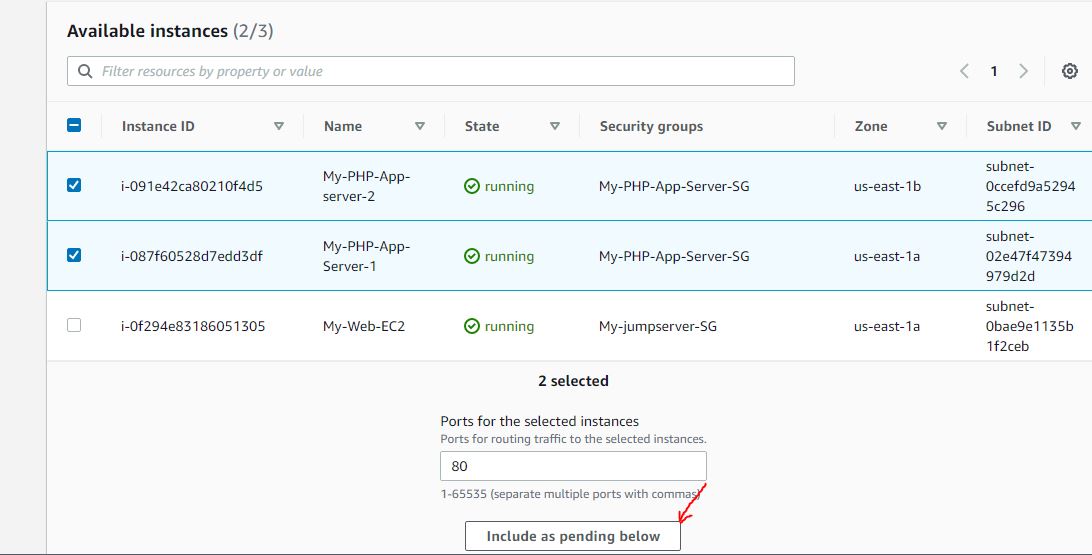
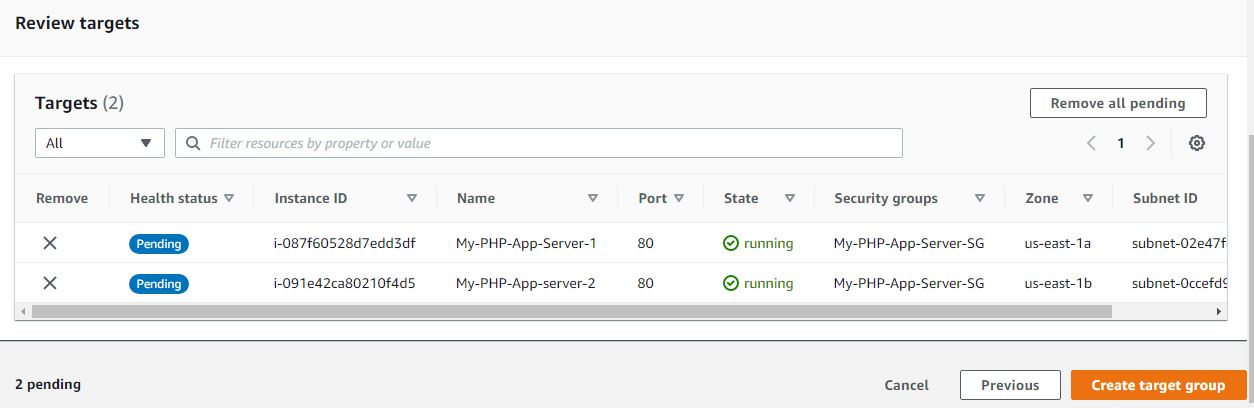
Go back to finish up with the creation of your load balancer. Select the target group created and Create the load balancer
Now check to see if the instances in your target groups are healthy or not. Even if it is still at initial stage, you can proceed to the next step
STEP 16. ALLOW THE LOAD BALANCER SECURITY GROUP IN YOUR APPLICATION SERVER SECURITY GROUP.
You need to do this in order to establish connectivity between your load balancer and your instances
Open the first Application Server/instance and click on edit inbound rule
Choose the same security group you have for your load balancer. Protocol should be TCP in port 80
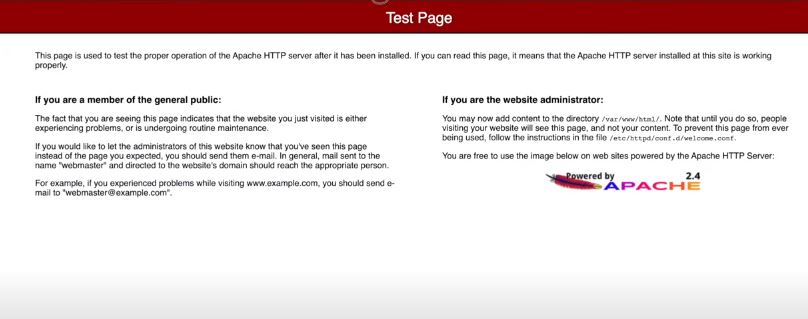
STEP 17: TEST THE LOAD BALANCER ON THE BROWSER
Open your load balancer and copy the load balancer DNS URL and paste it on the browser.
Can you see the Apache test page? Great! This means it is working!!
Also check to see if the load balancing is functioning as expected. From the terminal, change directory using the command below:
cd /var/www/html
So for you to validate if both request are going to the app servers, run the command:
echo "PHP Server 1" > indexl.html
Then navigate to your browser and at the end of the web address url (still using the DNS URL of your load balancer), type /index.html and press enter.
This page will displayed as shown below
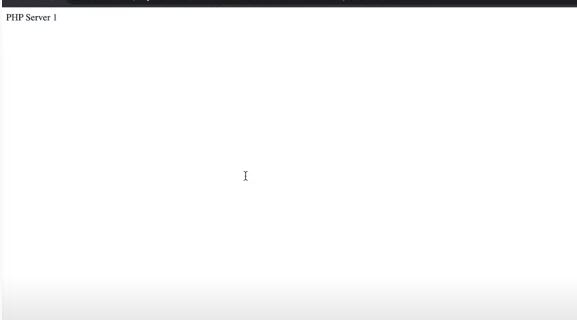
This shows it can route requests to the application server 1
I trust yours is working well. 👍
Weldone! you deserve some accolade 👏👏👏😊
So you have successfully completed layer 1 and layer 2 of this deployment. Proceed to create the last layer!
STEP 18: CREATE A DATABASE
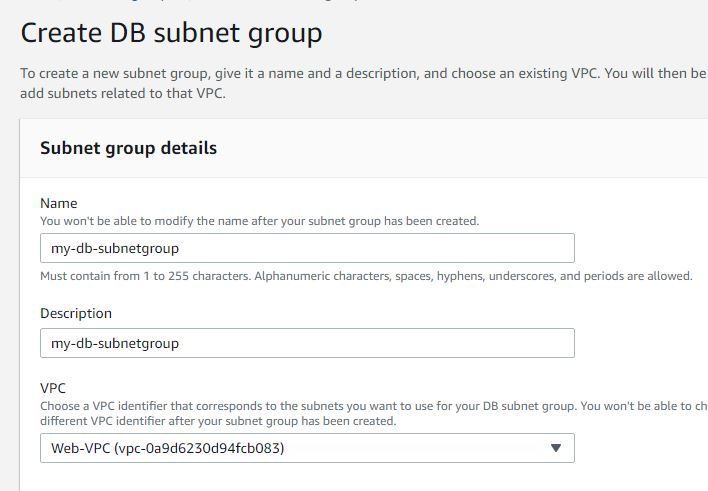
Before you proceed with database creation, first create a subnet group. This will allow you to select the subnets you have created for the database.
To create, navigate to RDB service and click on subnet group, click on Create DB subnet group
Select your VPC
Select at least 2 availability zones and 2 subnets you have created for your Database. Click on create
Now create the database (MySQL)
From the RDS service, click on create database, select MySQL
Select free tier
Type the database name and password
Select instance type
Choose your VPC
Create a security group for your database
Select at least one availability zone
Create your database
Please note that this may take several minutes to create
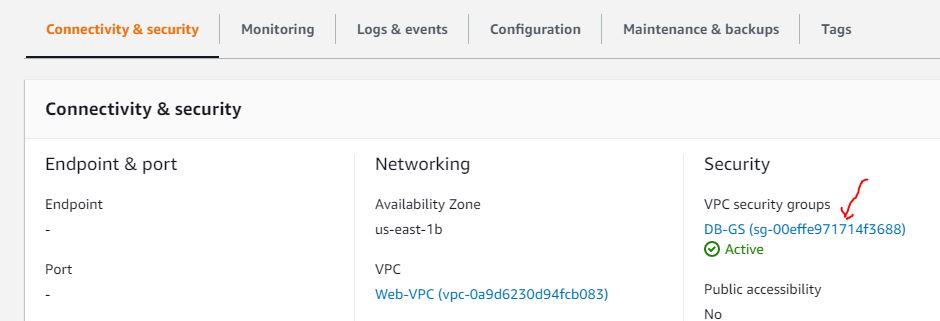
Once it has been created, you need to enable the connectivity between the app server and security group.
How can you do that?
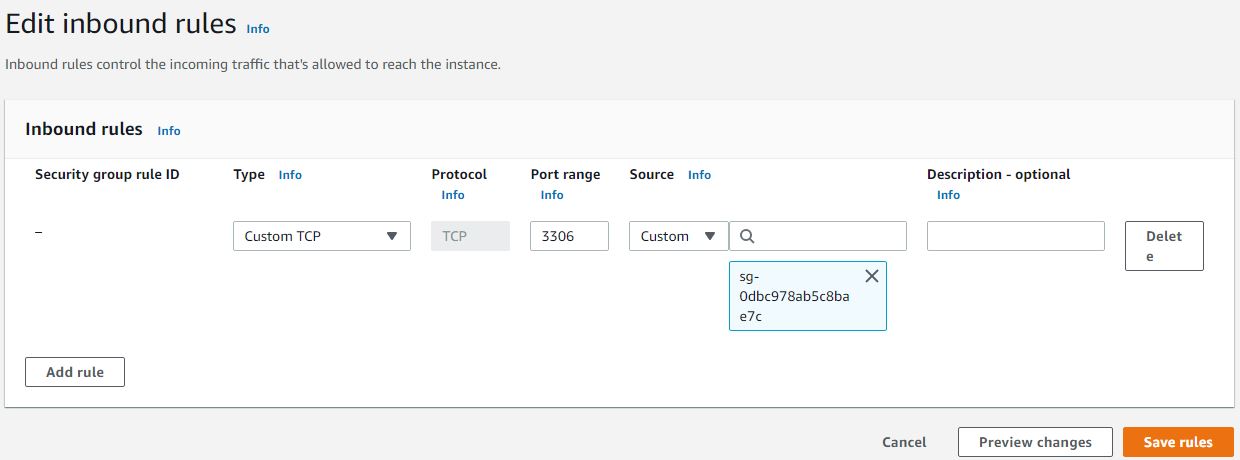
Go to the security group your of database and edit inbound rule
You should add 3306 as the database port and select your app server security group, the security group is the one you created for your application server, remember? see mine below to guide you
Next thing you should is to copy the database endpoint, go back to your terminal and run the command below in the PHP server (application server).
In order to execute that, change directory to phpMyAdmin folder with:
cd phpMyAdmin/
Rename the file from config.sample.inc.php to config.inc.php with the command below:
mv config.sample.inc.php config.inc.php
Now open the file
vi config.inc.php
Now that the file is open in your text editor, scroll down all the way in search of localhost, once located replace the localhost with the database endpoint you copied from the console after you created the database and then save the file.
See the image below to guide you:

STEP 19: TEST YOUR APPLICATION
Still using the load balancer DNS URL on the browser, replace the index.html you added at the end of the URL with phpMyAdmin and press enter.
Your PHP page should be displaying as shown below:
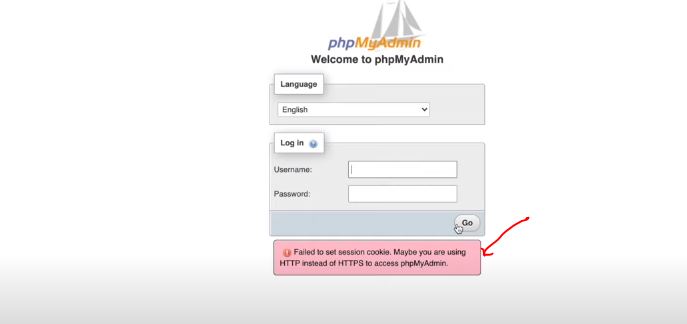
If you try to login in and click on "GO"
You will see error displayed as seen in the image of my php page above
To resolve it, go target group, select your target group, navigate to the attribute tab, click on Edit option to enable stickiness under load balancing algorithm.
Having done this, your request will flow in one server and in case of failure, it will be redirected to the other server
Once you have done this, go the browser (you can try incognito/inprivate browser) and try to login again and voila, it should be working now!!!
Congratulations!! 👏🥳
In this project I have been able to guide you on how to deploy a Three-tier web application on AWS.
Feel free to connect with me on linkedin via https://www.linkedin.com/in/helenchukwukelu and follow me for more valuable contents.
Kindly comment and share this article, thank you for reading!!! 👍


