

How I Deployed My Website On Aws Using Terraform
Learn how to automate the deployment of your infrastructure using Terraform


TERRAFORM is probably the most used tool to deploy cloud services. It is a fantastic tool, easily usable with descriptive language (DSL) called HCL, team-oriented and can be used across public clouds such as AWS, Azure, and GCP. In order words, Terraform is an infrastructure as code tool that lets you define infrastructure resources in human-readable configuration files that you can version, reuse and share.
Now let's proceed to the business requirement and solution of this project
PROJECT PRE-REQUISITES
• Aws CLI account
• Terraform
• Visual studio code (optional)
Business Requirement
Developers have a central repository for the application you want to deploy, users should be able to access the application from anywhere in the world. If the server goes down, the data on the web server should not be lost.
The AWS services used for the solution according to the business need above are listed below:
1. Amazon Simple Storage Service (S3): It is an object storage service that offers scalability, data availability, and better performance and encryption of your object. I will use it to host the static object of my application.
2. Amazon Elastic Block Store (EBS): It is an easy-to-use, high-performance block storage service designed for use with an EC2 for both throughput and transaction-intensive workloads at any scale.
3. Cloudfront: It is a content delivery network (CDN) that securely delivers data, applications, videos, and APIs to customers globally with low latency and high transfer speed.
Now that I have given you the requirements, I will go ahead to show you how to use Terraform to execute this Project. I will begin by writing my configuration files in Visual Studio code. I opened a new folder and created a main.tf file.
**DEFINE A PROVIDER **
The first block in my configuration file will be the infrastructure where I want to host my west servers. See the image of my provider block below:
#Define the provider
provider "aws" {
    region = "ap-southeast-1"
}
CREATE A VIRTUAL PRIVATE CLOUD (VPC)
In a VPC, you can deploy cloud resources into your own isolated virtual network. You may want to ask how you can get template of a resources, I will guide you. Go to your browser and type "terraform AWS create a virtual network". Open Terraform registry option and when you scroll down you will see the template for building your own block. I have created my VPC block as displayed below:
#Create a virtual network
resource "aws_vpc" "my_vpc" {
    cidr_block = "10.0.0.0/16"
    tags = {
        Name = "MY_VPC"
    }
}
In the code above, the resource type is “aws_vpc” while the resource name is “my_vpc”. The tag name of my VPC is “MY_VPC”. The cidr_block is also known as IP address range.
CREATE A SUBNET
Whenever you create a subnet, you will have to mention or link it to the VPC. My resource block below displays how I linked it:
#Create your application segment/subnet
resource "aws_subnet" "my_app-subnet" {
    tags = {
        Name = "APP_Subnet"
    }
    vpc_id = aws_vpc.my_vpc.id
    cidr_block = "10.0.1.0/24"
    map_public_ip_on_launch = true
    depends_on= [aws_vpc.my_vpc]

}
How do you get a VPC ID? It is by adding the resource type and resource name of your VPC which you have already defined. In this case, my VPC resource type is aws_vpc and name is my_vpc. I joined them together with dot (.) and ended it with “id”. That is how you can create your id in other resources where it is required in this project.
The cidr_block you see which stands for Classless Inter-domain Routing is required by AWS when you create a VPC. It is also known as IP address range.
The “map_auto_public_ip_on launch” is set as true because I want it to assign my IP address on launch. The last parameter there is “depends_on”. You use it to specify dependencies between resources and modules. So in this case the subnet depends on my VPC and will be created once the subnet is executed. The feature is also used when you want to control the sequence by which your resources will be created.
DEFINE YOUR ROUTE TABLE
A route table contains a set of rules, called routes, that determines where network traffic from your subnet or gateway is directed. My route table block is displayed as below:
#Define routing table
resource "aws_route_table" "my_route-table" {
    tags = {
        Name = "MY_Route_table"

    }
     vpc_id = aws_vpc.my_vpc.id
}
Now that route table has been defined, it must be associated with the subnet. Just like I clarified above, I got all these templates from Terraform provider documentation or registry.
ASSOCIATE SUBNET WITH ROUTE TABLE
#Associate subnet with routing table
resource "aws_route_table_association" "App_Route_Association" {
  subnet_id      = aws_subnet.my_app-subnet.id
  route_table_id = aws_route_table.my_route-table.id
}
I hope you understand how I got my subnet ID. It is by adding the resource type and resource name of my subnet which has been defined earlier in this page. Example aws_subnet + my_app-subnet + id = aws_subnet.my_app-subnet.id. Let’s move ahead!
CREATE AN INTERNET GATEWAY
Internet gateway will allow your servers to be connected to the internet. It serves two purposes; to provide a target in your VPC route tables for internet-routable traffic and to perform network address translation (NAT) for instances that have been assigned public IPV4 addresses. Displayed below is my resource block:
#Create internet gateway for servers to be connected to internet
resource "aws_internet_gateway" "my_IG" {
    tags = {
        Name = "MY_IGW"
    }
     vpc_id = aws_vpc.my_vpc.id
     depends_on = [aws_vpc.my_vpc]
}
As seen from the image, I attached VPC ID because It always has to be attached to the Internet gateway. It depends on the VPC to be executed.
ADD DEFAULT ROUTE IN ROUTE TABLE
We need a default route that will point to the internet gateway already defined. My resource block for that is displayed below:
#Add default route in routing table to point to Internet Gateway
resource "aws_route" "default_route" {
  route_table_id = aws_route_table.my_route-table.id
  destination_cidr_block = "0.0.0.0/0"
  gateway_id = aws_internet_gateway.my_IG.id
}
I decided not to specify the destination CIDR block. I hope you know how I got the route table ID and gateway ID from the explanation already given. Now the networking side of this project is defined and next is security group.
CREATE A SECURITY GROUP
A security group acts as a virtual firewall, controlling the traffic that is allowed to reach and leave the resources that it is associated with. It will control the inbound and outbound traffic for the EC2 instance. My resource block is shown below for the SG:
#Create a security group
resource "aws_security_group" "App_SG" {
    name = "App_SG"
    description = "Allow Web inbound traffic"
    vpc_id = aws_vpc.my_vpc.id
    ingress  {
        protocol = "tcp"
        from_port = 80
        to_port  = 80
        cidr_blocks = ["0.0.0.0/0"]
    }

    ingress  {
        protocol = "tcp"
        from_port = 22
        to_port  = 22
        cidr_blocks = ["0.0.0.0/0"]
    }

    egress  {
        protocol = "-1"
        from_port = 0
        to_port  = 0
        cidr_blocks = ["0.0.0.0/0"]
    }
}
Explanation:
Ingress is also known as an inbound rule which controls the inbound traffic that is allowed to reach your resources. From the configuration file above, I have 2 ingress rules. The first is for port 80 (HTTP) and the second is for port 22 (SSH). The CIDR block is also open for everyone but please don’t do that in a production server. I also have egress (outbound rule) defined and it will control the outbound traffic allowed to leave your resources
CREATE A PRIVATE KEY
A key is required in order to log in and access your web server. Displayed below is my resource block:
#Create a private key which can be used to login into the webserver
resource "tls_private_key" "key-pair" {
  algorithm = "RSA"
}
I used the resource type “tls_private_key” which is the provider through I can create my key. RSA is the algorithm I used. So it will save my private it. Next, I need to ensure that public key is defined and saved. Ride on with me!
SAVE PUBLIC KEY ATTRIBUTE FROM THE GENERATED KEY
For you to be able to log in, public key need has to be saved. My resource block for this is shown below:
#Save public key attributes from the generated key
resource "aws_key_pair" "App-Instance-Key" {
  key_name   = "key-pair"
  public_key = tls_private_key.key-pair.public_key_openssh
}
The key name there is still the same name I gave my private key. The public key parameter is gotten from adding the resource type of my private key + the key name + public_key_openssh. Got that? Great!!! That will save my public key.
SAVE THE KEY TO YOUR LOCAL SYSTEM
Here you will be saving the content of the private key locally so that you can log in and use the instance when needed. The resource type “local_file” is the one to be used for this and then the key name. Content parameter is the content of the private key which is stored in pem format. The filename is the name you want to save it with to your local system in pem format. Displayed below is my code block:
#Save the key to your local system
resource "local_file" "key-pair" {
    content     = tls_private_key.key-pair.private_key_pem
    filename = "key-pair.pem"
}
CREATE YOUR INSTANCE
An amazon EC2 instance is a virtual server in Amazon’s Elastic Compute Cloud (EC2) for running web applications on the AWS infrastructure. Below is what the resource block of my instance looks like:
#Create your webserver instance
resource "aws_instance" "Web" {
    ami = "ami-052efd3df9dad4825"
    instance_type = "t2.micro"
    tags = {
        Name = "WebServer1"
    }
    count =1
    subnet_id = aws_subnet.my_app-subnet.id
    key_name = "key-pair"
    security_groups = [aws_security_group.App_SG.id]

    provisioner "remote-exec" {
    connection {
        type = "ssh"
        user = "ec2-user"
        private_key = tls_private_key.key-pair.private_key_pem
        host = aws_instance.Web[0].public_ip
    }
    inline = [
       "sudo yum install httpd  php git -y",
       "sudo systemctl restart httpd",
       "sudo systemctl enable httpd",
    ]
  }

}
“AMI” is known as Amazon Machine Image provided by AWS which provides the information required to launch an instance. It must be specified before you can launch your instance. As you know we have different instance types, I choose to use t2.micro. The count parameter means the number of instances you want to create. Subnet ID is also required and key name is the name of your key that you have defined before now. I got the value of the security group ID just the way I explained of getting the ID of any resource you want but in this case, I enclosed it in a list because I can have multiple security groups attached.
These are actually what is required to create the instance but I also want to log in automatically and run some commands after it launches. That is the reason “provisioner” is used here (remote provisioner) and the name is remote-exec. So use Provisioner “remote-exec” when you want to run a command in your remote web server.
Note: It has to be defined under the resource block.
The connection parameters are also defined. The host value is gotten by adding the instance type, the instance name, the number of instances you want to create (it is zero here because in this context is counted as one), and the public IP. So once the connection parameters have been defined, the next is moving to inline part. In the inline part, you will define the commands you want to run. My command will install, restart and enable httpd service in the instance.
CREATE A BLOCK VOLUME FOR DATA PERSISTENCE
The code I will deploy in my EC2 instance will be in a certain location and the location is very critical to me. I will like to save my data and for that reason, I will create an EBS volume and attach it to my instance by mounting it to the specified location. So I will first create EBS volume. My resource block for that is displayed below:
#Create a block volume for data persistence
resource "aws_ebs_volume" "myebs1" {
  availability_zone = aws_instance.Web[0].availability_zone
  size              = 1
  tags = {
    Name = "ebsvol"
  }
}
The availability zone value is defined that way because I want the volume to be created in the same zone as my EC2 instance. I choose the size as 1GB and then tag name.
ATTACH THE VOLUME TO YOUR INSTANCE
Displayed below is the resource block:
#Attach the volume to your instance
resource "aws_volume_attachment" "attach_ebs" {
  depends_on = [aws_ebs_volume.myebs1]
  device_name = "/dev/sdh"
  volume_id   = aws_ebs_volume.myebs1.id
  instance_id = aws_instance.Web[0].id
  force_detach = true
}
The “depends_on” parameter was gotten by adding the resource type of volume, volume name and id. Force_detach is set to true in case I want to force detach the volume.
MOUNT THE VOLUME TO YOUR INSTANCE
I will use null resource type here which is mainly for mounting. Below is the resource block I used to mount the volume:
#Mount the volume to your instance
resource "null_resource" "nullmount" {
  depends_on = [aws_volume_attachment.attach_ebs]
    connection {
    type     = "ssh"
    user     = "ec2-user"
    private_key = tls_private_key.key-pair.private_key_pem
    host     = aws_instance.Web[0].public_ip
  }
  provisioner "remote-exec" {
    inline = [
      "sudo mkfs.ext4 /dev/xvdh",
      "sudo mount /dev/xvdh /var/www/html",
      "sudo rm -rf /var/www/html/*",
      "sudo git clone https://github.com/Chuks-Blosom/Terraform-Project-2.git /var/www/html"
    ]
  }
}
In the above block, the login parameter is needed there because it needs to log in to execute that. The provisioner “remote_exec” beneath the block is required to execute the commands (just as we did earlier) of formatting the disk and mounting. I will explain the commands used here.
"sudo mkfs.ext4 /dev/xvdh"
This command will format the drive using the type ext4 and /dev/xvdh is the volume name
"sudo mount /dev/xvdh /var/www/html"
This command will mount the volume and the location of my html code is /var/www/html
"sudo rm -rf /var/www/html/*"
This command will do clean-up after it has been mounted.
"sudo git clone https://github.com/Chuks-Blosom/Terraform-Project-2.git /var/www/html"
This will clone the Github repo. The developers must have deployed the application in Github repository. So you have to specify the part of the Git repo and replace it with the one above. In my own case, I specified the path to an image I want to use in my website.
There is a static object within my code that I want to upload to S3. I will start off by defining the S3 ID as shown below:
#Define S3 ID
locals {
 s3_origin_id = "s3-origin"
CREATE A BUCKET TO UPLOAD STATIC DATA
If you go to AWS Management console and try to create a bucket in S3, the parameters I defined here are the ones you will see there as well such as ACL, bucket name, region etc. Below is my resource block for creating a bucket:
#Create a bucket to upload your static data like images
resource "aws_s3_bucket" "specialbucket12345" {
  bucket = "specialbucket12345"
  acl    = "public-read-write"
  region = "ap-southeast-1"

  versioning {
    enabled = true
  }

  tags = {
    Name = "specialbucket12345"
    Environment = "Prod"
  }

 provisioner "local-exec" {
    command = "git clone https://github.com/Helen-Chukwukelu/Terraform-Project-2.git TERRAFORM-IMAGE1.JPG"
 }

}
The versioning option is enabled and that is a means of keeping multiple variants of an object in the same bucket. Once the bucket is created, I want to get a copy of the Github repo. Provisioner “local_exec” was used here in order to have the copy saved locally after the command is run.
ALLOW PUBLIC ACCESS TO THE BUCKET
You have to enable public access else the data won't be accessed. Displayed below is my resource block:
#Allow public access to the bucket
resource "aws_s3_bucket_public_access_block" "public_storage" {
 depends_on = [aws_s3_bucket.specialbucket12345]
 bucket = "specialbucket12345"
 block_public_acls = false
 block_public_policy = false
}
The bucket will be created with the resource above, now define the one that will upload the data to S3 bucket.
UPLOAD YOUR DATA TO S3 BUCKET
I have an image saved in my local system, also uploaded to my Github repository which I want to upload to S3. The ‘key’ parameter you will see in the resource block below means the name of the image you used to save it. The source is the path. Example Project_2 is my folders name while TERRAFORM-IMAGE1.JPG is the file name. MY block is shown below:
#Upload your data to S3 bucket
resource "aws_s3_bucket_object" "Object1" {
  depends_on = [aws_s3_bucket.specialbucket12345]
  bucket = "specialbucket12345"
  acl    = "public-read-write"
  key = "TERRAFORM-IMAGE1.JPG"
  source = "Project_2/TERRAFORM-IMAGE1.JPG"
}
CREATE A CLOUDFRONT DISTRIBUTION FOR CDN (CONTENT DELIVERY NETWORK)
Remember we have defined Cloudfront as a content delivery network (CDN) which securely delivers data, applications, videos and APIs to customers globally with low latency and high transfer speed.
#Create a Cloudfront distribution for CDN
resource "aws_cloudfront_distribution" "tera-cloufront1" {
    depends_on = [ aws_s3_bucket_object.Object1]
    origin {
        domain_name = aws_s3_bucket.specialbucket12345.bucket_regional_domain_name
        origin_id = local.s3_origin_id
    }
    enabled = true
      default_cache_behavior {
        allowed_methods = ["DELETE", "GET", "HEAD", "OPTIONS", "PATCH", "POST", "PUT"]
        cached_methods = ["GET", "HEAD"]
        target_origin_id = local.s3_origin_id

        forwarded_values {
            query_string = false

            cookies {
               forward = "none"
            }
        }
        viewer_protocol_policy = "allow-all"
        min_ttl = 0
        default_ttl = 3600
        max_ttl = 86400
    }

    restrictions {
        geo_restriction {
           restriction_type = "none"
        }
    }

     viewer_certificate {
        cloudfront_default_certificate = true

    }
}
In the above resource block, among the parameters are domain name creation as well as the origin/source. The origin ID has been defined earlier on this page so that is what I used. Default cache parameters are required and you can confirm all those options/parameters used in the block above from your AWS management console when you go to Cloudfront distribution Pane.
UPDATE THE CDN IMAGE URL TO YOUR WEBSERVER CODE
Once a Cloudfront has been created, the URL has to be updated on my code which has been deployed on my AWS instance. Connection parameters again are defined and provisioner “remote_exec” is also used to run the commands as you will see in the image below. The command will update the image source in my code defining the value or the URL of my Cloudfront. My resource block is displayed below:
#Update the CDN image URL to your webserver code.
resource "null_resource" "Write_Image" {
    depends_on = [aws_cloudfront_distribution.tera-cloufront1]
    connection {
    type     = "ssh"
    user     = "ec2-user"
    private_key = tls_private_key.Web-Key.private_key_pem
    host     = aws_instance.Web[0].public_ip
     }
  provisioner "remote-exec" {
        inline = [
            "sudo su << EOF",
                    "echo \"<img src='http://${aws_cloudfront_distribution.tera-cloufront1.domain_name}/${aws_s3_bucket_object.Object1.key}' width='300' height='380'>\" >>/var/www/html/index.html",
                    "echo \"</body>\" >>/var/www/html/index.html",
                    "echo \"</html>\" >>/var/www/html/index.html",
                    "EOF",
        ]
  }

}
WOW! If you have gotten here, you deserve some accolades 👏👏👏 Guess what? We are almost done! Take a coffee, talk a short walk to stretch and return back.
Let’s start rounding off! The code to provision your infrastructure is ready, we just have to test what we have done and see the result.
SUCCESS MESSAGE AND STORING THE RESULT IN A FILE
Here the null resource is required and it depends on the resource type and nullmount” ie null_resource.nullmount. I want the result to be saved in result.txt and also have my IP address displayed. See my block as displayed below:
#success message and storing the result in a file
resource "null_resource" "result" {
    depends_on = [null_resource.nullmount]
    provisioner "local-exec" {
    command = "echo The website has been deployed successfully and >> result.txt  && echo the IP of the website is  ${aws_instance.Web[0].public_ip} >>result.txt"
  }
}
TEST THE APPLICATION
Finally, I want to automatically let Terraform automatically execute and open up a browser to access the URL. The wonders of automation :). The resource block is shown below:
#Test the application
resource "null_resource" "running_the_website" {
    depends_on = [null_resource.Write_Image]
    provisioner "local-exec" {
    command = "start microsoft edge ${aws_instance.Web[0].public_ip}"
  }
}
Now that the configuration file is ready, save it and get ready to deploy!
Open your terminal and run the commands below👇
Terraform Init
This command is used to initialize a working directory containing Terraform configuration files. Now run the next command:
terraform validate
Terraform validate command is used to validate the syntax of Terraform files. See the image of my result below:
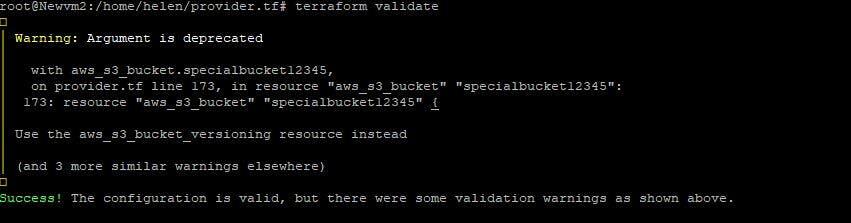
It performed a syntax check on the files and displayed a warning which I can choose to correct, but it validated the syntax anyways. The next command is terraform plan.
terraform plan
The Terraform plan command evaluates a Terraform configuration to determine the desired state of all resources it declares, then compares that desired state to the real infrastructure objects being managed with the current working directory and workspace. The last command is terraform apply
terraform apply
You will see from your result that your resources have been created. Your browser will open automatically and your website will display; successfully deployed! 💃✔
Now the good part of Terraform is that those codes can be re-used to provision your infrastructure again, avoiding manual work, saving you from stress, saving time and increasing delivery speed.
To learn about all Terraform commands and how they can be implemented, I am recommending spacelift.io/blog/terraform-commands-cheat-... It offers a complete overview of Terraform commands with examples. The article helps get straight to the needed command when using the Terraform CLI and points out when the given command is useful.
Lastly, You may need to destroy your infrastructure if this is not for production in order not to incur extra costs in your billing. To destroy, run the command below
terraform destroy
CONGRATULATION!!! 😊👍👏
Please like, comment, and share your feedback with me in the comment section. I am open to learning and answering your questions if you have any.